SOMs
Jump to Product
NXP
00363 i.MX91 OSM-L with IW612
Datasheet
Reference Manual
Hardware Design Guide
Hardware Design Files
Software Releases
Pre-built Images
00324 i.MX93 SODIMM
Datasheet
Reference Manual
Hardware Design Guide
Hardware Design Files
Software Releases
Pre-built Images
00359 LGA with Murata 2EL
Datasheet
Reference Manual
Hardware Design Guide
Hardware Design Files
Software Releases
Pre-built Images
00363 i.MX93 OSM-L with IW612
Datasheet
Reference Manual
Hardware Design Guide
Hardware Design Files
Software Releases
Pre-built Images
00408 i.MX95 OSM-L with IW612
Coming Soon
00377 i.MX8M Plus OSM-L with IW612
Datasheet
Reference Manual
Hardware Design Guide
Hardware Design Files
Software Releases
Pre-built Images
STMicroelectronics
00378 STM32MP257F OSM-L with CC3351
Datasheet
Reference Manual
Hardware Design Guide
Hardware Design Files
Software Releases
Pre-built Images
00395 STM32MP257F OSM-L with IW610
Datasheet
Reference Manual
Hardware Design Guide
Hardware Design Files
Software Releases
Pre-built Images
Texas Instruments
00364 AM6254 OSM-L SOM with IW612
Datasheet
Reference Manual
Hardware Design Guide
Hardware Design Files
Software Releases
Pre-built Images
Carrier Boards
00326 (SODIMM Carrier Board)
Supported SOMs - i.MX93 00324 SODIMM SOM
User Guide
Hardware Design Guide
Hardware Design Files
00406 (LGA Carrier Board)
Supported SOMs - i.MX93 00359 LGA SOM
User Guide
Hardware Design Guide
Hardware Design Files
00365 (OSM-L Carrier Board)
Supported SOMs
i.MX93 00363 OSM-L SOM
i.MX8M Plus 00377 OSM-L SOM
STM32MP2 00378 OSM-L SOM
STM32MP2 00395 OSM-L SOM
AM6254 00364 OSM-L SOM
Block Diagram - i.MX93 00363 OSM-L SOM on 00365 Carrier Board
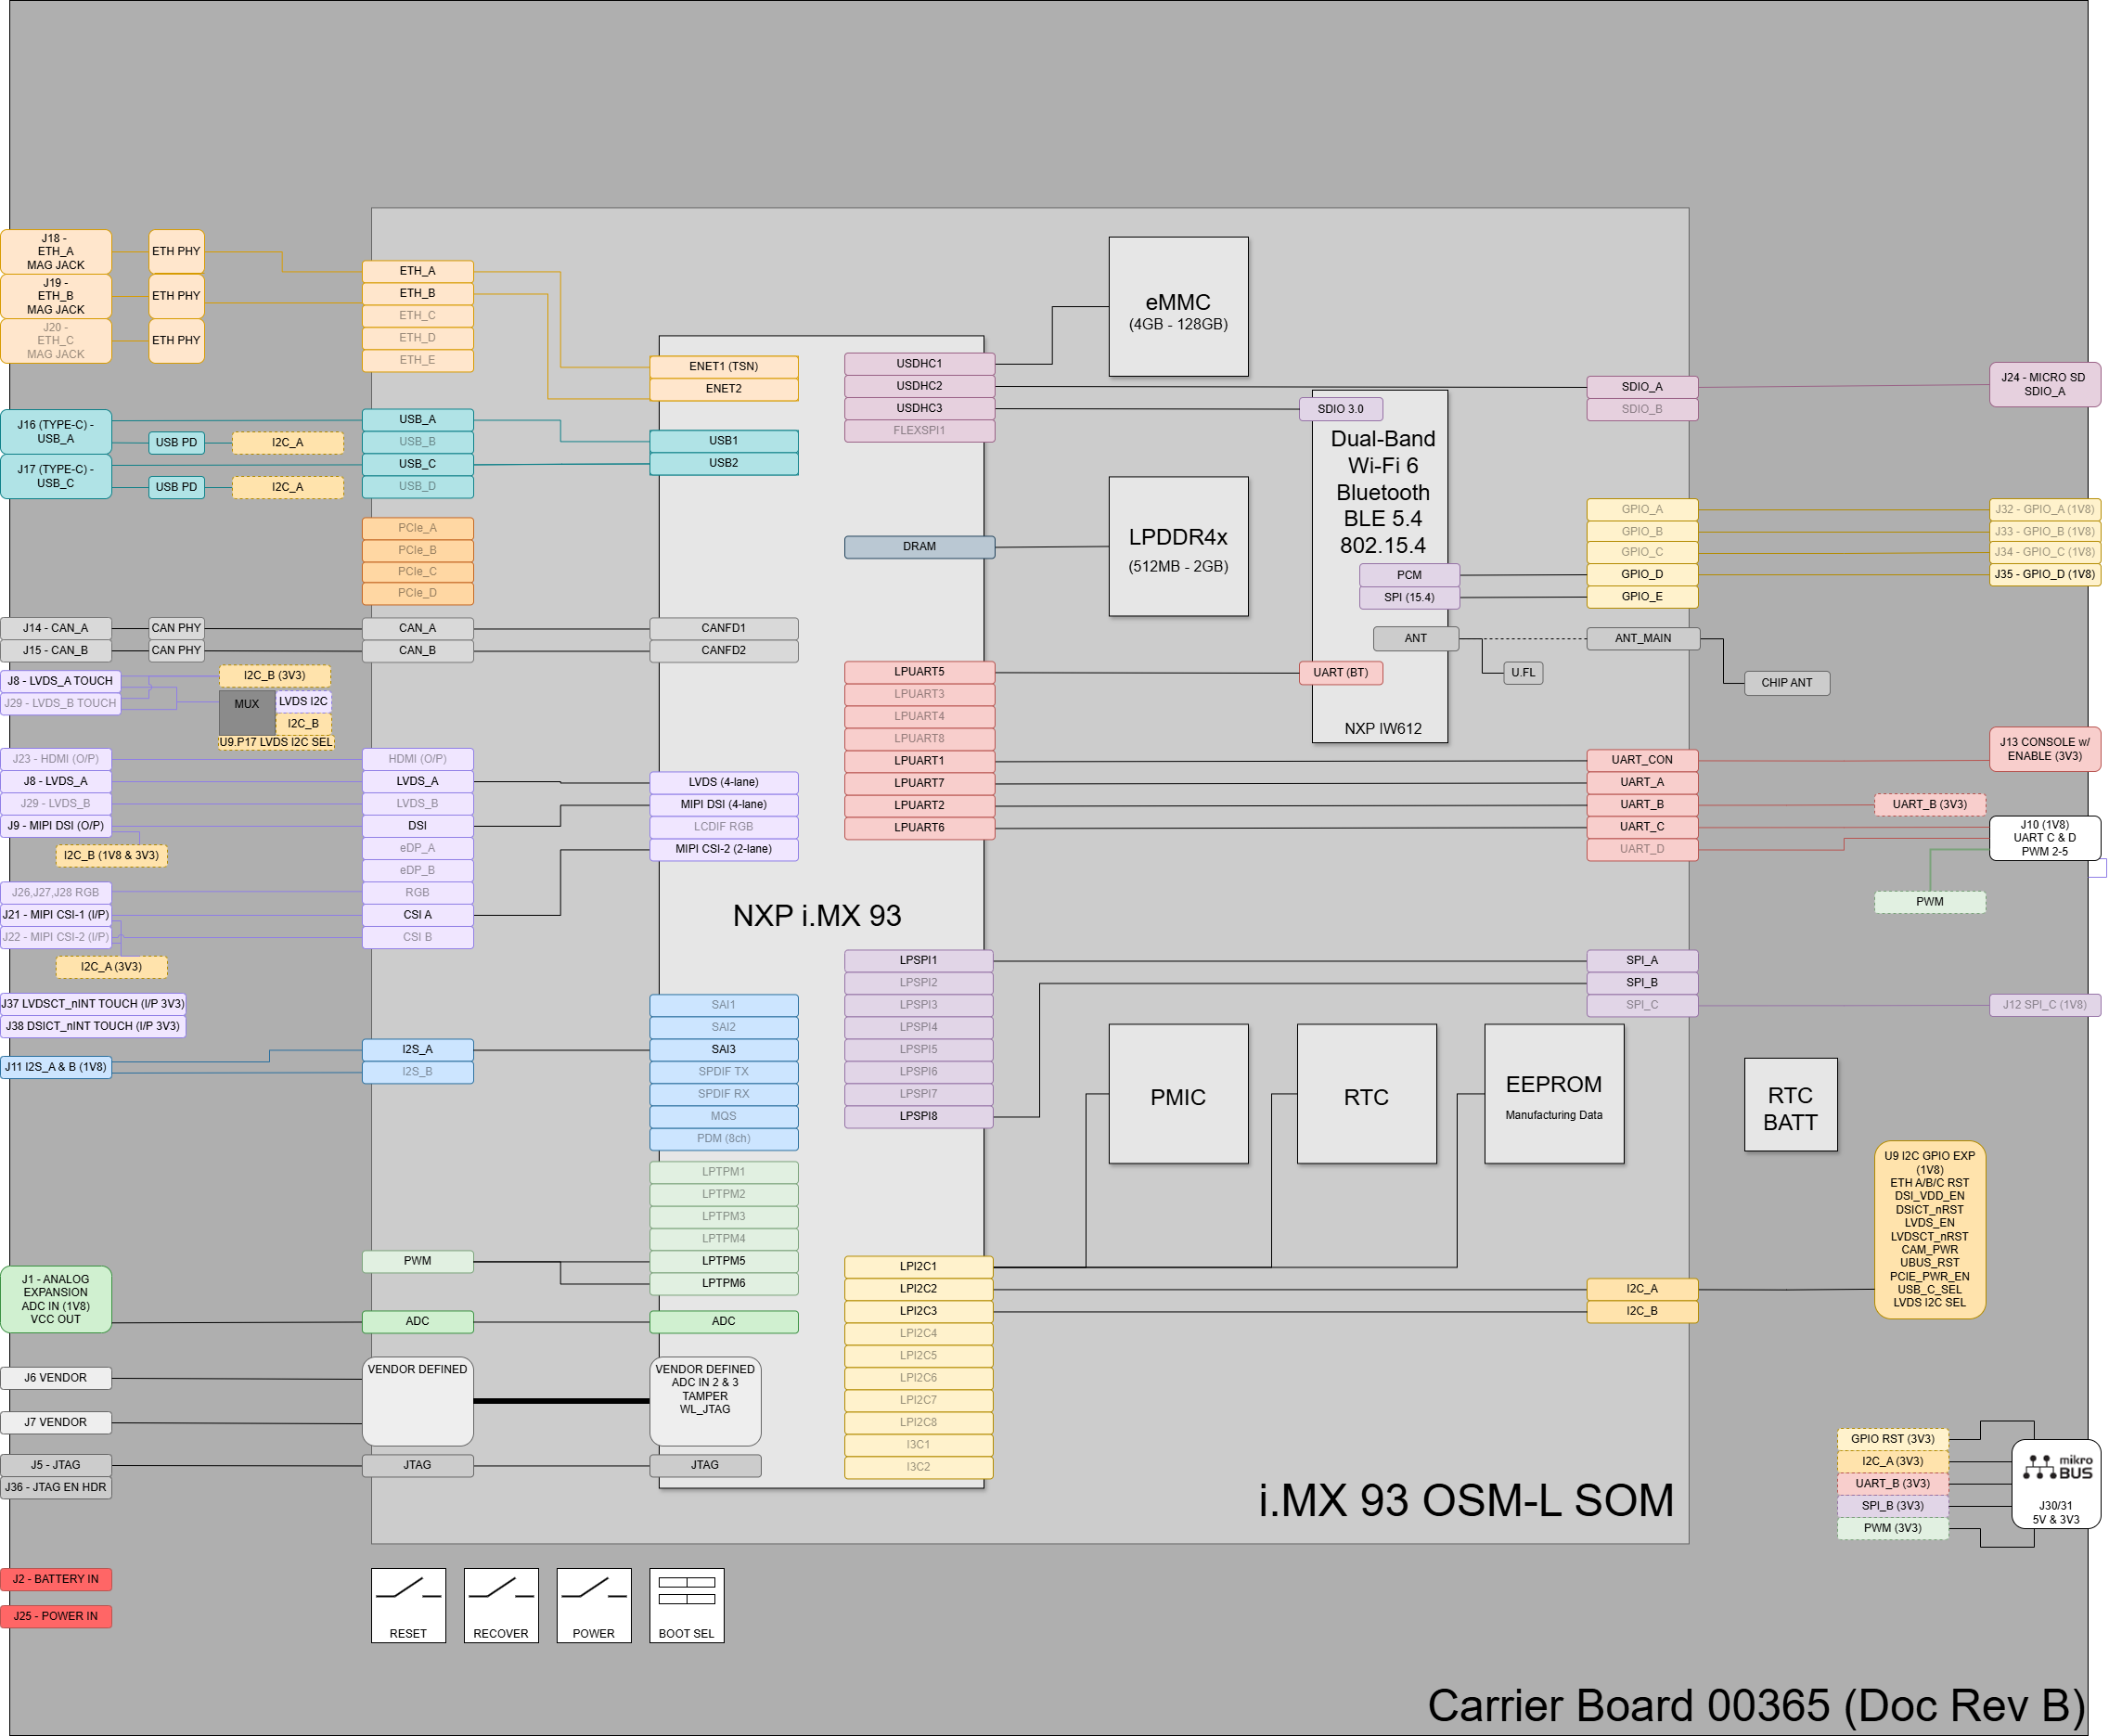
i.MX93 00363 OSM-L SOM on 00365 Carrier Board Block Diagram
Block Diagram - STM32MP257 00395 OSM-L SOM on 00365 Carrier Board

STM32MP257 00395 OSM-L SOM on 00365 Carrier Board Block Diagram
User Guide
Hardware Design Guide
Hardware Design Files
Supported Touchscreen Displays
10” LVDS 1280×800 – GLT1011280800is1
7” LVDS 1024×600 – GLT0701024600is2
5.5” MIPI-DSI 720×1280 – GLT0557201280is1
2.8” SPI 240×320 – GLT028240320is1
Getting Started with Embedded Linux
Cargt Provided Software Resources
Public Yocto Source Code Repositories
Cargt GitHub Organization – Public repositories for Yocto layers, example applications, and board support packages.
Public Package Repositories
Cargt Package Repository – Public repositories for pre-built packages and binaries for development with Cargt hardware designs.
Public Pre-compiled Images
Pre-built complete system images for supported Cargt hardware suitable for initial flashing or full system recovery.
Incremental update images compatible with SWUpdate for in-field updates without reflashing the entire system.
Running Linux on a Cargt design
Flashing a Pre-compiled image to eMMC / SD card using UUU on an i.MX design
Note
CARGT recommends eMMC for performance and reliability. eMMC is the default. Using SD card requires changing U-Boot variables and expert knowledge.
Put the board into the UUU mode as per the hardware design’s user guide.
Option 1: For OSM-L based designs, this typically involves holding the BOOT button while powering on the board.
Option 2: U-boot Environment Variable Method can be used if BOOT button is not available. See U-Boot Environment Variables section for details.
Connect the board to the host computer via USB and check the connection by running:
uuu -lsusbThe output should list the connected device.
Download the appropriate pre-compiled image from the Cargt Package Repository Images.
This will usually be a
.wicfile, possibly compressed (e.g.,.wic.zst)..wicis a disk image format that includes partitioning and filesystems.
Use the UUU tool to flash both the bootloader and image to eMMC / SD card.
Note
This will erase all existing data on the eMMC / SD card.
Select the appropriate command based on your target storage:
uuu -b emmc_all imx-boot-tagged <image_file>.wic.zst
uuu -b sd_all imx-boot-tagged <image_file>.wic.zst
Reboot the board.
UUU Example
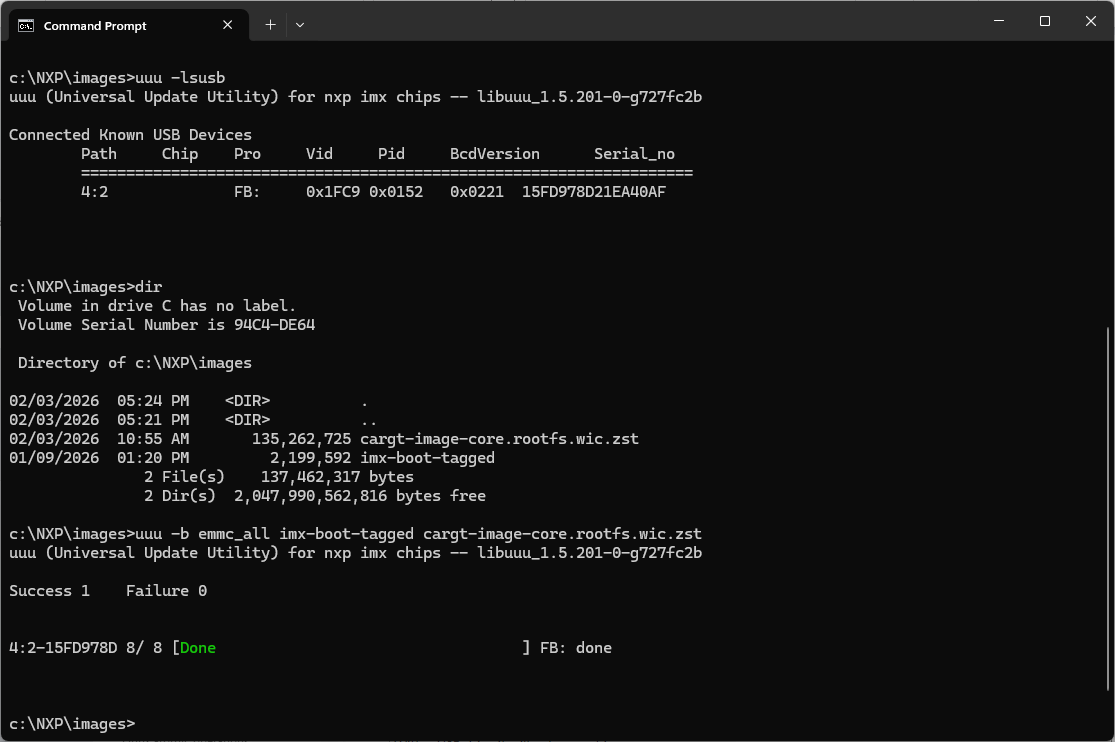
UUU commands example output
Extra options for UUU:
To flash only specific partitions, use the corresponding UUU command (e.g.,
-b emmc_boot,-b emmc_rootfs).For verbose output, add the
-vflag to the UUU command.To log the flashing process, use the
-l <log_file>option.To run the bootloader (SPL and U-Boot) from RAM:
uuu imx-bootTo program just the bootloader to eMMC or SD Card
Select the appropriate command based on your target storage:
uuu -b emmc imx-boot
uuu -b sd imx-boot
UUU allows multiple compression formats for the
.wicimage files, so you can use:Select the appropriate command based on your target storage: uuu -b emmc_all imx-boot <image_file>.wic[.zst, .gzip, etc.] uuu -b sd_all imx-boot <image_file>.wic[.zst, .gzip, etc.]
Flashing a Pre-compiled image to eMMC using STM32Cube on an STM32MP2
Booting from eMMC
Flashing a Pre-compiled image to the SD card using STM32Cube on an STM32MP2
Booting from the SD card
Understanding Flash Layouts and Partitions
Flash Layout Overview
Partition Table Examples
Filesystem Types
WIC Overview
Creating Custom Flash Layouts with WIC
Autogrow Partitions
Understanding U-Boot Environment Variables
U-Boot variables can be accessed through either the console or ssh session.
- Console: Interrupt the boot process by pressing any key during the U-Boot countdown.
This will drop you to the U-Boot command prompt. U-Boot variables can be viewed and modified using the
printenv,setenv, andsaveenvcommands in the U-Boot console.SSH: Connect to the device via SSH once Linux has booted and access U-Boot variablesusing the
fw_setenvandfw_printenvutilities.
NXP - Enter UUU mode using U-Boot Environment Variable Method
- To enter UUU mode without using the BOOT button, you can set the U-Boot environment variable
bootcmdto boot into UUU mode on the next reboot.Use either
fw_setenvorsetenvto set the variable.# Using fw_setenv (from Linux shell) fw_setenv bootcmd 'fastboot auto' fw_printenv bootcmd # Verify the change reboot # Using setenv (from U-Boot console) setenv bootcmd 'fastboot auto' saveenv printenv bootcmd # Verify the change reset
Connecting Displays on a Cargt design
Electrical Connections
Identify the display interface supported by your LCD display (e.g., LVDS, MIPI-DSI, SPI).
Display Part Number |
Interface |
Size (inches) |
|---|---|---|
GLT1011280800is1 |
LVDS |
10 |
GLT0701024600is2 |
LVDS |
7 |
GLT0557201280is1 |
MIPI-DSI |
5.5 |
GLT028240320is1 |
SPI |
2.8 |
Identify the corresponding connector on the carrier board or SOM for the display interface.
Ensure the display is powered off before making any connections.
LVDS & MIPI - There are 2 types of flex cables used for these display interfaces
Type A: Top-Top
Type B: Top-Bottom
The flex cable type needed depends on the specific display model and board revision. Always refer to the documentation for your specific display model and board revision to determine the correct flex cable type if unsure.
Warning
Pin 1 on display connector MUST connect to Pin 1 on the board. Only rely on the silkscreen PIN markings and documentation to identify Pin 1 on both the display and board. Do NOT rely on the “J” silkscreen marking position as it may not be consistent across different display models or board revisions.
Identify the CORRECT flex cable needed to connect the display to the board.
Orient the board and display connectors, identifying and aligning Pin 1 on both. Then select the flex cable type (A or B) that matches the orientation of the connectors and allows Pin 1 on the display to connect to Pin 1 on the board. You may have to fold the flex cable in a specific way to achieve the correct orientation.
Warning
Do NOT kink the flex cable as it may damage the internal wiring and cause the display to not function properly.
SPI - The SPI display uses a Cargt MikroBus adapter board and standard MikroBus cable, so the pinout is consistent across different display models and board revisions.
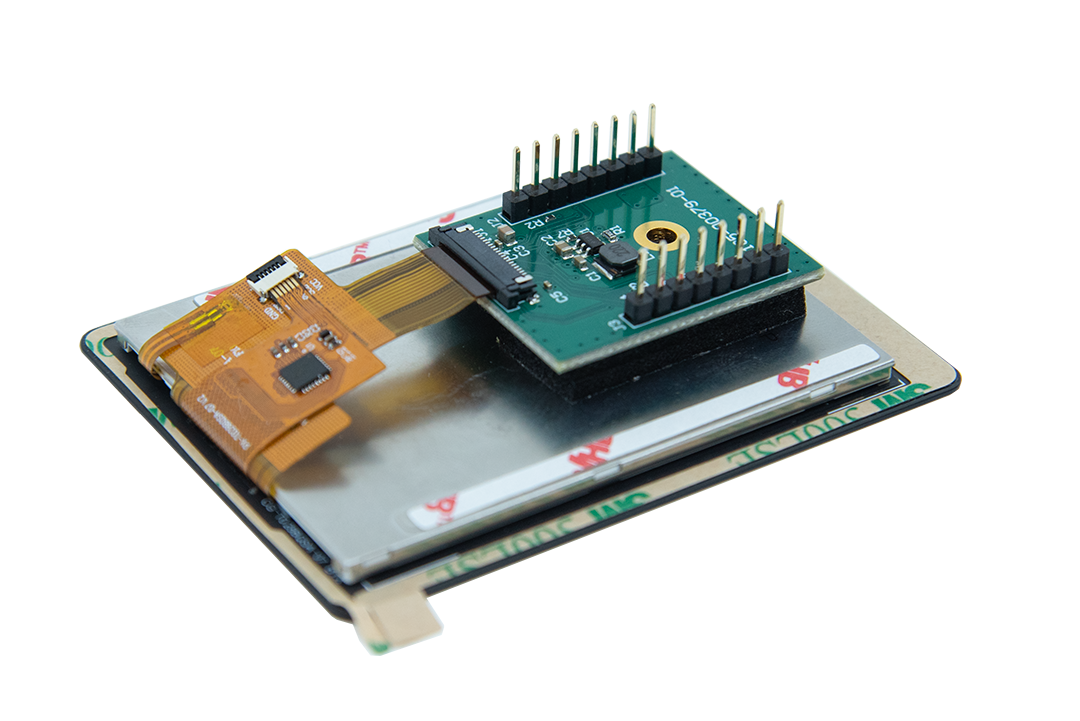
2.8” SPI display with Cargt MikroBus adapter board
Software Configuration
If you bought an evaluation kit with a display, the display should be pre-configured and work out of the box with the pre-compiled images from the Cargt Package Repository Images.
If you are using your own display, you may need to modify the device tree to configure the display correctly. Refer to the Yocto Development section for instructions on how to modify the device tree and build custom images with the necessary display configuration.
If you are using a display that is sold by Cargt, then the necessary device tree configuration should already be included in the pre-compiled images from the Cargt Package Repository Images.
How to check for available device tree overlays for display support:
As part of build:
ls <build_dir>/tmp/deploy/images/<machine>/*.dtb
On target device:
ls -l /boot/*.dtb
# Example output - NXP:
/boot/imx93-cargt-00363-00365-glt0557201280is1.dtb
/boot/imx93-cargt-00363-00365-glt1011280800is1.dtb
/boot/imx93-cargt-00363-00365.dtb
# Example output - STM32MP2:
/boot/stm32mp257f-cargt-00395-00365v3-glt0557201280is1.dtb
/boot/stm32mp257f-cargt-00395-00365v3-glt0701024600is2.dtb
/boot/stm32mp257f-cargt-00395-00365v3-glt1011280800is1.dtb
/boot/stm32mp257f-cargt-00395-00365v3.dtb
Set the correct Device Tree Blob (DTB) for the display by modifying the U-Boot environment variable fdtfile to point to the appropriate DTB file that matches your display model.
# Using fw_setenv (from Linux shell)
fw_setenv fdtfile /boot/<dtb_file_name>
fw_printenv fdtfile  # Verify the change
reboot

# Using setenv (from U-Boot console)
setenv fdtfile /boot/<dtb_file_name>
saveenv
printenv fdtfile  # Verify the change
reset
Examples:
# For GLT0557201280is1 5.5" MIPI-DSI display:
fw_setenv fdtfile /boot/imx93-cargt-00363-00365-glt0557201280is1.dtb

# For GLT1011280800is1 10.1" LVDS display:
fw_setenv fdtfile /boot/imx93-cargt-00363-00365-glt1011280800is1.dtb
SWUpdate
Incremental update images compatible with SWUpdate can be found in the Cargt Package Repository Images or can be built in your Yocto build environment.
The output file has a .swu extension.
For reference, the bitbake recipe file used to create SWUpdate images may have a -swu.bb ending or be called swupdate-image.bb.
Example Usage: bitbake <machine-name>-swu or bitbake swupdate-image
For a target to be SWUpdate compatible, the flash image must be partitioned correctly. Typically it requires 2 identical partions for the compiled code in addition to any other customer data partitions. This is sometimes referred to as a ping-pong or A/B partition scheme. This allows the system to boot from one partition while the other is being updated, providing a fallback in case of update failure. The SWUpdate client will manage the switching between these partitions during the update process.
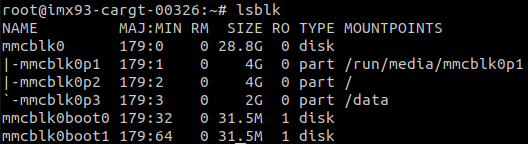
Checking the run partition
lsblk
Before update example output:
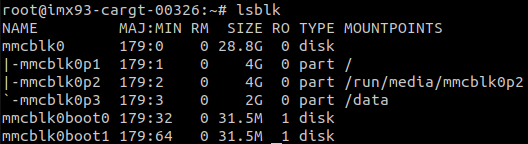
Kernel and root file system are on mmcblk0p1
After update example output:
Kernel and root file system are on mmcblk0p2
SWUpdate Methods
Web Server - Command Line Startup
Only needed if the SWUpdate web server is not already running on the target device.
Start the SWUpdate web server to enable browser-based uploads at http://<target_ip>:8080/:
swupdate -e web
Optionally specify a different port:
swupdate -e web -p 8081
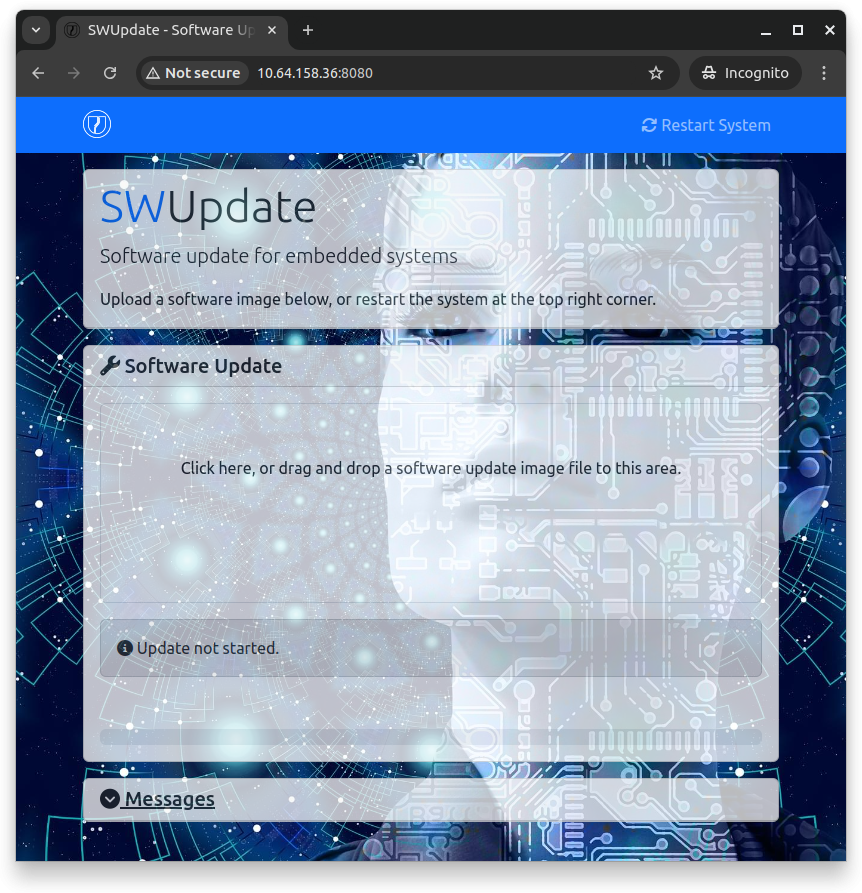
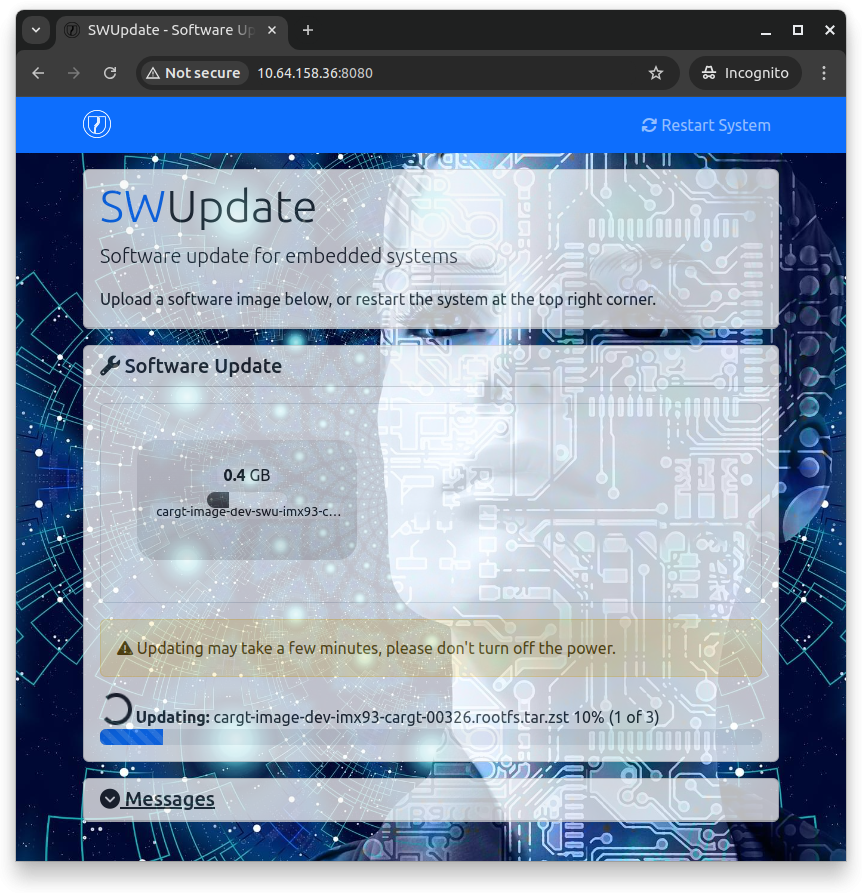
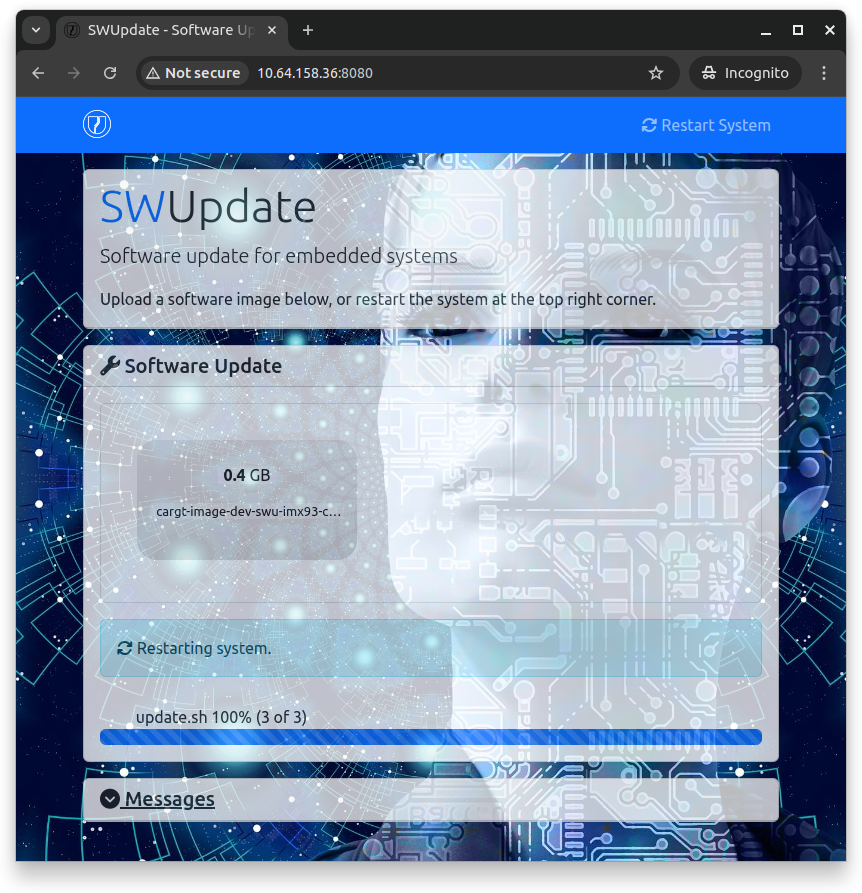
Web Server - Drag and Drop
On a connected host computer, open a web browser and navigate to the SWUpdate web server running on the target device.
http://<target_ip>:8080/
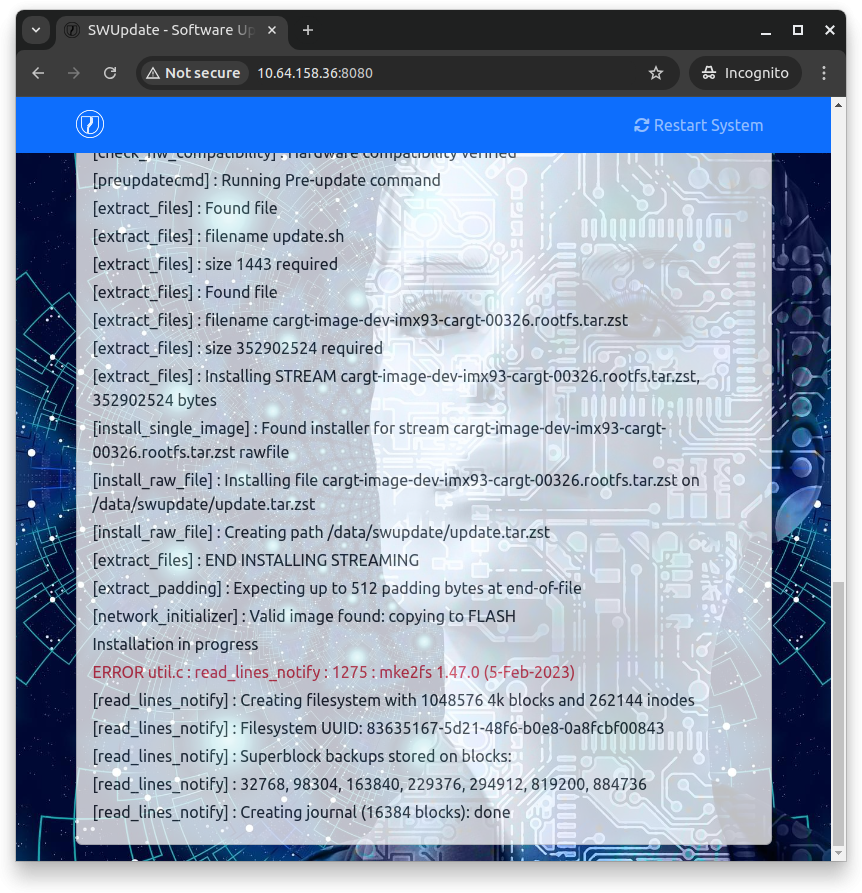
Follow the on-screen instructions to upload and install the update file.

USB Drive or Local File Installation
Direct installation from a local file on the target device can be done using the SWUpdate command line interface. This is useful if the update file has already been transferred to the target device using another method.
swupdate -i <update_file>.swu
Add verbose output for detailed progress:
swupdate -i <update_file>.swu -v
TFTP Server
Download and install an update file directly from a TFTP server running on your host computer.
Setup:
Host computer (TFTP server): Start a TFTP server and place the
.swufile in the TFTP directoryTarget device (TFTP client): Run the SWUpdate command to download and install from the host
Command on target device:
swupdate -d "-t tftp://<host_ip>/<update_file>.swu"
Example with specific host IP and file:
swupdate -d "-t tftp://192.168.1.100/my-system-update.swu"
The -d flag specifies the download option, and -t indicates a TFTP source.
Note
Ensure the TFTP server on your host is accessible from the target device and the update file is in the TFTP server’s root directory or specify the full path.
SWUpdate Concepts
How SWUpdate Works
Update Script Example
Update Image Example
U-Boot Environment Hooks and Partition Management
Package Management on a Cargt design
Cargt Package Repository
Updating and Installing Packages using the Cargt Package Repository
apt-get update
apt-get install <package_name>
Listing Installed Packages
apt list --installed
Using a Downloaded Package File
Updating using a downloaded .deb package file
dpkg -i /<path_to_downloaded_package>/<package_file>.deb
Using your Own Package Repository
Generating a Package Repository
In your Yocto build environment, run:
bitbake package-indexThen navigate to
<build_dir>/tmp/deploy/deb/<machine>/to find the generated.debrepository files.
Simple Package Repository Hosting using Python HTTP Server
On your development host, navigate to the package repository directory (as above) and start a simple HTTP server:
cd <path_to_package_repo>
python3 -m http.server <chosen_port_number>
python3 -m http.server 8081
Note
Ensure that the chosen port number is open in your firewall settings. Choose a port number > 1024 and that is not already in use by another service such as SWUpdate (default port 8080). Open example:5678
Configuring the Target to use your Package Repository
On the target device, add your repository to the APT sources list:
echo "deb [trusted=yes] http://<your_server_ip>:<port_number>/ ./" >> /etc/apt/sources.list.d/my-custom-repo.list
apt-get update
apt-get install <package_name>
Advanced
You can list all of the packages in your repository by navigating to
http://<your_server_ip>:<port_number>/in a web browser.Bitbake produces multiple directories such as
armv8a,all,<machine-name>etc. If you add each directory as a separate line in the sources list, APT will be able to find more packages. Then the package server can be run from the<build_dir>/tmp/deploy/deb/directory.To do it at build time, add the following lines to your
local.conffile on the development machine:PACKAGE_FEED_URIS += " http://<your_server_ip>:<port_number>/ " PACKAGE_FEED_ARCHS = "all armv8a" Depending on your package repo, you may also need to specify: PACKAGE_FEED_BASE_PATHS = "deb"Further information: https://docs.yoctoproject.org/ref-manual/variables.html#term-PACKAGE_FEED_ARCHS
Updating using a downloaded to target .deb package file
dpkg -i /<path_to_downloaded_package>/<package_file>.deb
Remote Access
Reverse SSH using Teleport
Provisioning
Connecting to a Remote Device
Using SSH Tunnel for RDP
Connectivity
Bluetooth
NFC
Cellular
IP Networking Examples
IP Forwarding
DHCP Server (dnsmasq, Kea)
DNS Server Examples (dnsmasq)
Firewall Examples (nftables)
Remote Packet Capture
Advanced Configuration
One-Time Programmable Memory with i.MX Application Processors
Setting MAC Addresses
One-Time Programmable Memory for STM32 MPU Application Processors
Setting MAC Addresses
Production EEPROM Programming
Cargt’s Production EEPROM Methodology - Cargt’s Production EEPROM Data Structure
Supported SOMs
Supported Methods - I2C via U-Boot - I2C via Linux
Using Cargt’s Production EEPROM Tools
Limiting RAM size for testing
eMMC
Boot Partition Management
Pseudo-SLC for eMMC
Advanced Development
Debugging with Lauterbach
Java Enablement on i.MX
Network Booting using NFS and TFTP in U-Boot
Secure Boot (AHAB) with i.MX93
Overview of Secure Boot
Generating Keys and Certificates
Signing Images with the Code Signing Tool (CST)
Programming Keys using One-Time Programmable Memory
Configuring U-Boot and Linux for Secure Boot
Yocto Development
Development Guides
Layers, Recipes, Machines, Distros
Adding a New Machine
Changes in Meta Layer, U-Boot, Linux, SWUpdate
Using VSCode on the Host with Remote-SSH Extension
Using bitbake
Building Packages & Images
Intermediate Commands:
listtasks,clean,cleansstate,menuconfig,do_configure,do_deploy
Using devtool
Modify Existing Recipe (
modify)Add New Recipe (
add) - CMake Example - Python Example - NodeJS ExampleUpgrade Recipe (
upgrade)Build on Host (
build)Test on Target (
deploy-target,undeploy-target)Update Meta Layers (
finish)Other devtool Commands (
reset,status,menuconfig,find-recipe,edit-recipe,ide-sdk)
Image Customization
Adding/Removing Packages
Customizing Bootloader
Customizing Kernel - Adding Kernel Modules - Applying Kernel Patches - Configuring Kernel Options
Customizing SWUpdate
Customizing Device Tree
Creating Custom Images
Adding systemd Services
SBOM Generation
Enable SPDX generation in your
local.conffile:echo 'INHERIT += "create-spdx"' >> conf/local.conf
Build the image:
bitbake <image_name>Find the generated SBOM in the deploy directory:
<build_dir>/tmp/deploy/spdx/<machine>/recipe-<image>.spdx.json
Yocto Tutorial
Setup build machine
The build machine needs to have:
- repo tool installed
- Required packages for Yocto development (e.g., git, tar, python3, etc.)
Download and Install the repo utility from Google
To use this manifest repo, the
repoutility must be installed first:
mkdir -p ~/bin
curl https://storage.googleapis.com/git-repo-downloads/repo > ~/bin/repo
chmod a+x ~/bin/repo
PATH=${PATH}:~/bin
Install required packages for Yocto development
On Ubuntu, you can install the required packages with:
sudo apt-get update
sudo apt-get install -y gawk wget git diffstat unzip texinfo gcc build-essential chrpath socat cpio python3 python3-pip python3-pexpect xz-utils debianutils iputils-ping python3-git python3-jinja2 libegl1-mesa libsdl1.2-dev python3-subunit mesa-common-dev zstd liblz4-tool file locales
On other Linux distributions, the package names may differ. Please refer to the Yocto Project documentation for the specific packages required for your distribution.
Set the locale in Ubuntu:
sudo locale-gen en_US.UTF-8
Setup the Yocto environment
Initialize the repo and download the source code
Initialize the repo with the appropriate manifest for your target hardware:
Cargt GitHub account has public repositories for Yocto layers, example applications, and board support packages.
Generic repo commands:
# Navigate to directory where you want to download the source code
mkdir -p ~/yocto
cd ~/yocto
repo init -u <manifest_url> -b <branch_name>
repo sync
Cargt example for NXP i.MX:
mkdir -p ~/yocto
cd ~/yocto
repo init -u https://github.com/cargt/imx_manifest -b scarthgap -m cargt-imx-6.6.36-2.1.0.xml
repo sync
This will download the necessary Yocto layers and source code for building images for Cargt’s i.MX91, i.MX93, and i.MX8M Plus hardware designs.
Cargt example for STM32MP2:
mkdir -p ~/yocto
cd ~/yocto
repo init -u https://github.com/cargt/stm32mp_manifest -b scarthgap -m cargt-stm32mp2.xml
repo sync
This will download the necessary Yocto layers and source code for building images for Cargt’s STM32MP2 hardware designs.
Initialize build environment for NXP processors
To see available scripts:
ls
# Output:
# imx-cargt-setup.sh  imx-setup-release.sh  README  README-IMXBSP  setup-environment  sources
To see available distributions and machines:
ls -1 sources/meta-imx-cargt/conf/distro
# Output:
# cargt-imx-wayland.conf
# cargt-imx-xwayland-ap.conf
# cargt-imx-xwayland.conf
# cargt-imx-xwayland-connman.conf

ls -1 sources/meta-imx-cargt/conf/machine/
# Output:
# imx8mp-cargt-00377-00365.conf
# imx93-cargt-00324-00326.conf
# imx93-cargt-00359-00406.conf
# imx93-cargt-00363-00365.conf
# imx93-cargt-00363-osm-som.conf
Setting up the build environment - for the first time:
# Generic:
DISTRO=<selected-distro> MACHINE=<selected-machine> source ./imx-cargt-setup.sh -b <build_dir>
# Example:
DISTRO=cargt-imx-xwayland MACHINE=imx93-cargt-00363-00365 source ./imx-cargt-setup.sh -b bld-xwayland
This will set up the environment variables for the build and navigate to the build directory.
Subsequent builds can be enabled with:
# Generic:
source setup-environment <build_dir>
# Example:
source setup-environment bld-xwayland
This will use the previous distro and machine environment variables for the build and navigate to the build directory.
Initialize build environment for STM32MP2
See the Readme at the Cargt GitHub repository for STM32MP2 for instructions on how to set up the build environment for STM32MP2 designs: https://github.com/cargt/stm32mp_manifest/tree/scarthgap
Initialize the environment and chose the MACHINE and DISTRO using the scripts provided.
source ./layers/meta-st/meta-st-cargt/scripts/envsetup.sh
Note
The script may interject with a list of packages that the build machine needs to install. Whether you choose to install those packages or not, you can still proceed with the setup. However, the list will need to be installed at some point to ensure a successful build.
Example:
sudo apt-get update
sudo apt-get install -y bsdmainutils gcc-multilib git-lfs libgmp-dev libmpc-dev libsdl1.2-dev pylint python3-git socat texinfo xterm
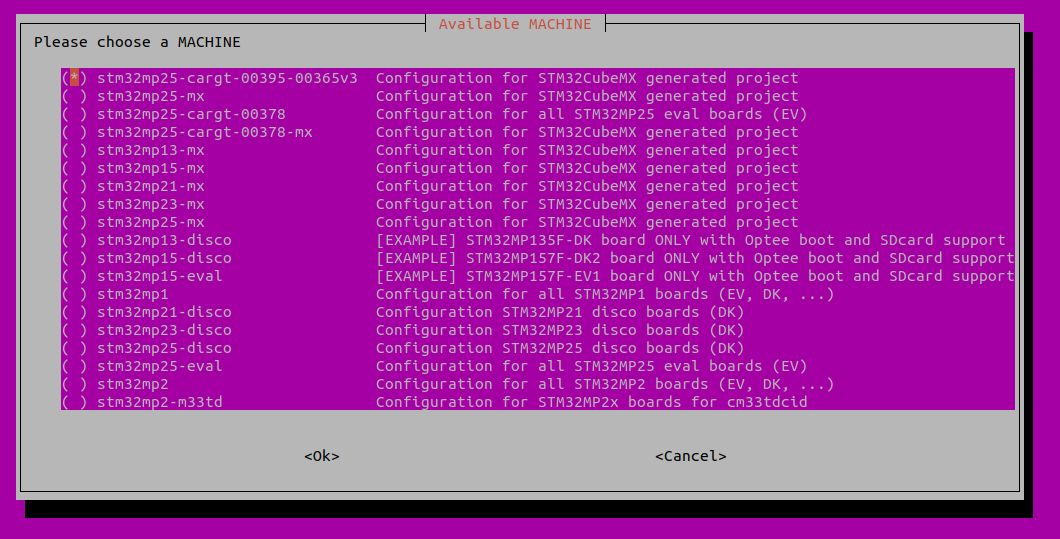
Choose a DISTRO and a MACHINE:
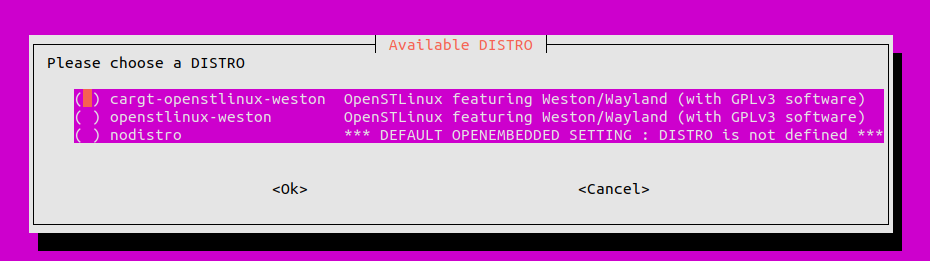
You must accept the EULA to use certain packages included those needed by the GPU. See here for more information.
After accepting the EULA, you should see configuration details similar to this:
===========================================================================

Configuration files have been created for the following configuration:

   DISTRO            :  cargt-openstlinux-weston
   DISTRO_CODENAME   :  scarthgap
   MACHINE           :  stm32mp25-cargt-00395-00365v3
   BB_NUMBER_THREADS :  <no-custom-config-set>
   PARALLEL_MAKE     :  <no-custom-config-set>

   BUILDDIR          :  build-cargtopenstlinuxweston-stm32mp25-cargt-00395-00365v3
   DOWNLOAD_DIR      :  <disable>
   SSTATE_DIR        :  <disable>

   SOURCE_MIRROR_URL :  <no-custom-config-set>
   SSTATE_MIRRORS    :  <disable>

   WITH_EULA_ACCEPTED:  YES

===========================================================================
Note
It must say “WITH_EULA_ACCEPTED: YES” to ensure the necessary packages for the GPU and other components are included in the build.
You can now start a build with a command like this:
bitbake cargt-image-dev
Bitbake the image
Build images
Note
This assumes you have already set up the build environment as described above and are in the build directory.
To find available images to build:
bitbake-layers show-recipes | grep image
# Output:
# Highlighting just the cargt ones:
# cargt-image-chrome:
# cargt-image-chrome-swu:
# cargt-image-core:
# cargt-image-core-swu:
# cargt-image-demo:
# cargt-image-demo-swu:
# cargt-image-dev:
# cargt-image-dev-swu:
To build an image:
bitbake <image_name>
# Example:
bitbake cargt-image-dev
bitbake cargt-image-demo
bitbake cargt-image-demo-swu
This will build the specified image and its dependencies, resulting in a complete system image that can be flashed to the target hardware.
The output images will be located in the <build_dir>/tmp/deploy/images/<machine>/ directory.
Build Packages
To build a specific package:
bitbake <package_name>
# Example:
bitbake linux-imx
This will build the specified package and its dependencies, resulting in a .deb file that can be installed on the target device.
The output package will be located in the <build_dir>/tmp/deploy/deb/<machine>/ directory.
Deploy to Target
See the Running Linux on a Cargt design section for instructions on how to flash pre-compiled images to the target hardware using UUU or STM32Cube.
See the SWUpdate section for instructions on how to use SWUpdate to install incremental update images on the target hardware.
See the Package Management on a Cargt design section for instructions on how to use APT or dpkg to install packages on the target hardware.
Advanced Yocto Usage
Build fails
Try restarting the build
Lockup or exit failure
This could be due to a build machine resource issue (e.g., out of memory) or a transient issue with the build process.
Try reducing the number of parallel build threads by setting
BB_NUMBER_THREADSandPARALLEL_MAKEin yourlocal.conffile to a lower value.Use the number of CPU cores (or less) on your build machine as a general guideline. The build is also a function of available RAM, so if you have 12 cores but only a small amount of RAM, you may want to limit to 10 threads to avoid out of memory issues.
Trial and error may be needed to find the optimal number of threads for your specific build machine and configuration. Monitor the RAM usage during the build to see if it approaches or exceeds the available memory.
For 12 cores, you could set
<build_dir>/conf/local.confwith:BB_NUMBER_THREADS = "10" PARALLEL_MAKE = "-j 10" echo 'BB_NUMBER_THREADS = "10"' >> conf/local.conf echo 'PARALLEL_MAKE = "-j 10"' >> conf/local.conf