Yocto Development
Yocto Tutorial
Setup build machine
The build machine needs to have:
- repo tool installed
- Required packages for Yocto development (e.g., git, tar, python3, etc.)
Download and Install the repo utility from Google
To use this manifest repo, the
repoutility must be installed first:
mkdir -p ~/bin
curl https://storage.googleapis.com/git-repo-downloads/repo > ~/bin/repo
chmod a+x ~/bin/repo
PATH=${PATH}:~/bin
Install required packages for Yocto development
On Ubuntu, you can install the required packages with:
sudo apt-get update
sudo apt-get install -y gawk wget git diffstat unzip texinfo gcc build-essential chrpath socat cpio python3 python3-pip python3-pexpect xz-utils debianutils iputils-ping python3-git python3-jinja2 libegl1-mesa libsdl1.2-dev python3-subunit mesa-common-dev zstd liblz4-tool file locales
On other Linux distributions, the package names may differ. Please refer to the Yocto Project documentation for the specific packages required for your distribution.
Set the locale in Ubuntu:
sudo locale-gen en_US.UTF-8
Setup the Yocto environment
Initialize the repo and download the source code
Initialize the repo with the appropriate manifest for your target hardware:
Cargt GitHub account has public repositories for Yocto layers, example applications, and board support packages.
Generic repo commands:
# Navigate to directory where you want to download the source code
mkdir -p ~/yocto
cd ~/yocto
repo init -u <manifest_url> -b <branch_name>
repo sync
Cargt example for NXP i.MX:
mkdir -p ~/yocto
cd ~/yocto
repo init -u https://github.com/cargt/imx_manifest -b wrynose -m cargt-imx-6.18.20-2.0.0.xml
repo sync
This will download the necessary Yocto layers and source code for building images for Cargt’s i.MX 91, i.MX 93, i.MX 95, and i.MX 8M Plus hardware designs.
Cargt example for STM32MP2:
mkdir -p ~/yocto
cd ~/yocto
repo init -u https://github.com/cargt/stm32mp_manifest -b scarthgap -m cargt-stm32mp2.xml
repo sync
This will download the necessary Yocto layers and source code for building images for Cargt’s STM32MP2 hardware designs.
Initialize build environment for NXP processors
To see available scripts:
ls
# Output:
# imx-cargt-setup.sh  imx-setup-release.sh  README  README-IMXBSP  setup-environment  sources
To see available distributions and machines:
ls -1 sources/meta-imx-cargt/conf/distro
# Output:
# cargt-imx-rt.conf
# cargt-imx-wayland.conf
# cargt-imx-xwayland-ap.conf
# cargt-imx-xwayland.conf

ls -1 sources/meta-imx-cargt/conf/machine/
# Output:
# imx8mp-cargt-00377-00365.conf
# imx91-cargt-00363-00365.conf
# imx91-cargt-00363-osm-som.conf
# imx93-cargt-00324-00326.conf
# imx93-cargt-00359-00406.conf
# imx93-cargt-00363-00365.conf
# imx93-cargt-00363-00428.conf
# imx93-cargt-00363-osm-som.conf
# imx95-cargt-00414-00365.conf
# imx95-cargt-00414-00428.conf
# imx95-cargt-00414-osm-som.conf
The layer also supports NXP’s i.MX 95 FRDM development boards, whose machine files come from
NXP’s meta-imx: imx95-15x15-lpddr4x-frdm and imx95-19x19-lpddr5-frdm-pro. Cargt
publishes images for both, and they are useful as references before Cargt hardware arrives.
cargt-imx-rt is the real-time (PREEMPT_RT) distro for i.MX 95 designs. Build it in its own
build directory. See Real-Time Linux (PREEMPT_RT) on i.MX 95.
Setting up the build environment - for the first time:
# Generic:
DISTRO=<selected-distro> MACHINE=<selected-machine> source ./imx-cargt-setup.sh -b <build_dir>
# Example:
DISTRO=cargt-imx-xwayland MACHINE=imx93-cargt-00363-00365 source ./imx-cargt-setup.sh -b bld-xwayland
This will set up the environment variables for the build and navigate to the build directory.
Subsequent builds can be enabled with:
# Generic:
source setup-environment <build_dir>
# Example:
source setup-environment bld-xwayland
This will use the previous distro and machine environment variables for the build and navigate to the build directory.
Initialize build environment for STM32MP2
See the Readme at the Cargt GitHub repository for STM32MP2 for instructions on how to set up the build environment for STM32MP2 designs: https://github.com/cargt/stm32mp_manifest/tree/scarthgap
Initialize the environment and chose the MACHINE and DISTRO using the scripts provided.
source ./layers/meta-st/meta-st-cargt/scripts/envsetup.sh
Note
The script may interject with a list of packages that the build machine needs to install. Whether you choose to install those packages or not, you can still proceed with the setup. However, the list will need to be installed at some point to ensure a successful build.
Example:
sudo apt-get update
sudo apt-get install -y bsdmainutils gcc-multilib git-lfs libgmp-dev libmpc-dev libsdl1.2-dev pylint python3-git socat texinfo xterm
Choose a DISTRO and a MACHINE:
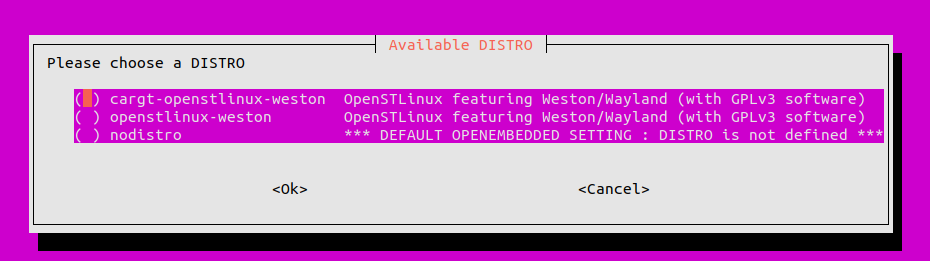
The MACHINE menu lists the Cargt machines together with ST’s own boards. Select the one for your SOM:
Machine |
Hardware |
|---|---|
|
00395-01 SOM on the 00365 carrier |
|
00395-02 SOM on the 00365 carrier |
|
00395 SOM on the older 00365 revision 3 carrier (single-bank layout, no RAUC A/B updates) |
You must accept the EULA to use certain packages included those needed by the GPU. See here for more information.
After accepting the EULA, you should see configuration details similar to this:
===========================================================================

Configuration files have been created for the following configuration:

   DISTRO            :  cargt-openstlinux-weston
   DISTRO_CODENAME   :  scarthgap
   MACHINE           :  stm32mp25-cargt-00395-02-00365
   BB_NUMBER_THREADS :  <no-custom-config-set>
   PARALLEL_MAKE     :  <no-custom-config-set>

   BUILDDIR          :  build-cargtopenstlinuxweston-stm32mp25-cargt-00395-02-00365
   DOWNLOAD_DIR      :  <disable>
   SSTATE_DIR        :  <disable>

   SOURCE_MIRROR_URL :  <no-custom-config-set>
   SSTATE_MIRRORS    :  <disable>

   WITH_EULA_ACCEPTED:  YES

===========================================================================
Note
It must say “WITH_EULA_ACCEPTED: YES” to ensure the necessary packages for the GPU and other components are included in the build.
You can now start a build with a command like this:
bitbake cargt-image-dev
Bitbake the image
Build images
Note
This assumes you have already set up the build environment as described above and are in the build directory.
To find available images to build:
bitbake-layers show-recipes | grep image
# Output:
# Highlighting just the cargt ones:
# cargt-image-chrome:
# cargt-image-chrome-swu:
# cargt-image-core:
# cargt-image-core-swu:
# cargt-image-demo:
# cargt-image-demo-swu:
# cargt-image-dev:
# cargt-image-dev-swu:
# cargt-image-stress-test:
# cargt-image-stress-test-swu:
# cargt-image-rt:                (real-time build only; see real-time-linux)
# cargt-image-rt-swu:
To build an image:
bitbake <image_name>
# Example:
bitbake cargt-image-dev
bitbake cargt-image-demo
bitbake cargt-image-demo-swu
This will build the specified image and its dependencies, resulting in a complete system image that can be flashed to the target hardware.
The output images will be located in the <build_dir>/tmp/deploy/images/<machine>/ directory.
Build Packages
To build a specific package:
bitbake <package_name>
# Example:
bitbake linux-imx
This will build the specified package and its dependencies, resulting in a .deb file that can be installed on the target device.
The output package is in <build_dir>/tmp/deploy/deb/, in the directory for its package architecture: kernel packages such as linux-imx in the machine’s directory (imx93_cargt_00363_00365, with underscores), and most others in the CPU or SoC directories such as armv8a or cortexa55. See Package Management on a Cargt design.
Deploy to Target
See Running Linux on a Cargt design for instructions on how to flash pre-compiled images to the target hardware using UUU or STM32Cube.
See SWUpdate for instructions on how to use SWUpdate to install full root file system update images on the target hardware.
See Package Management on a Cargt design for instructions on how to use APT or dpkg to install packages on the target hardware.
Advanced Yocto Usage
Build fails
Try restarting the build
Lockup or exit failure
This could be due to a build machine resource issue (e.g., out of memory) or a transient issue with the build process.
Try reducing the number of parallel build threads by setting
BB_NUMBER_THREADSandPARALLEL_MAKEin yourlocal.conffile to a lower value.Use the number of CPU cores (or less) on your build machine as a general guideline. The build is also a function of available RAM, so if you have 12 cores but only a small amount of RAM, you may want to limit to 10 threads to avoid out of memory issues.
Trial and error may be needed to find the optimal number of threads for your specific build machine and configuration. Monitor the RAM usage during the build to see if it approaches or exceeds the available memory.
For 12 cores, you could set
<build_dir>/conf/local.confwith:BB_NUMBER_THREADS = "10" PARALLEL_MAKE = "-j 10" echo 'BB_NUMBER_THREADS = "10"' >> conf/local.conf echo 'PARALLEL_MAKE = "-j 10"' >> conf/local.conf
Try using the
BB_PRESSURE_MAX_MEMORYdetection setting in the<build_dir>/conf/local.conffile.This monitors the Linux kernel’s Pressure Stall Information (PSI) via /proc/pressure/memory. It pauses the start of new tasks until the current memory pressure goes below the threshold. It acts as a last resort to prevent Out-Of-Memory (OOM) errors during heavy builds.
100,000 has been found to be an acceptable value but adjust it for your setup. A smaller value triggers the throttling faster.
BB_PRESSURE_MAX_MEMORY = "100000"

echo 'BB_PRESSURE_MAX_MEMORY = "100000"' >> conf/local.conf
It shows up like this in the build output:
NOTE: Pressure status changed to CPU: None, IO: None, Mem: True (CPU: 945702.0/None, IO: 20.3/None, Mem: 132625.6/100000.0) - using 15/16 bitbake threads
NOTE: Pressure status changed to CPU: None, IO: None, Mem: False (CPU: 999309.6/None, IO: 345.9/None, Mem: 0.0/100000.0) - using 13/16 bitbake threads
SBOM Generation
Yocto generates an SPDX SBOM for every image by default (create-spdx is
part of INHERIT_DISTRO), so there is nothing to enable.
Build the image:
bitbake <image_name>Find the image’s SBOM next to the image:
i.MX:
<build_dir>/tmp/deploy/images/<machine>/<image>-<machine>.rootfs.spdx.jsonSTM32MP2:
<build_dir>/tmp/deploy/images/<machine>/<image>-<distro>-<machine>.rootfs.spdx.tar.zst
The published images on
yocto.cargt.cominclude the same files.